Using Mininet to Set Up the Virtual Network
Goals
This showcase builds upon the previous one, Using Simulated Applications in a Real Network, and demonstrates how setting up the virtual network can be vastly simplified using Mininet.
4.6Introduction
Mininet is a software package on Linux for setting up a virtual network on the local computer. Using Mininet, one can create a virtual network topology with just a few commands. Each host (and switch, router, etc) has its own virtual network stack, and one can run commands on these virtual hosts.
Mininet utilizes network namespaces and virtual network interfaces of the Linux kernel under the hood. One just needs to specify the network topology (the number of virtual hosts and switches, and connections between them), then Mininet handles the creation of network namespaces, virtual network interfaces, and routes.
Mininet scenarios can be run using its command line tool mn, or via Python
scripts. This showcase uses the Python API.
Installing Mininet
On Debian and derivatives like Ubuntu, install with the following command:
$ sudo apt install mininet openvswitch-testcontroller
The Setup
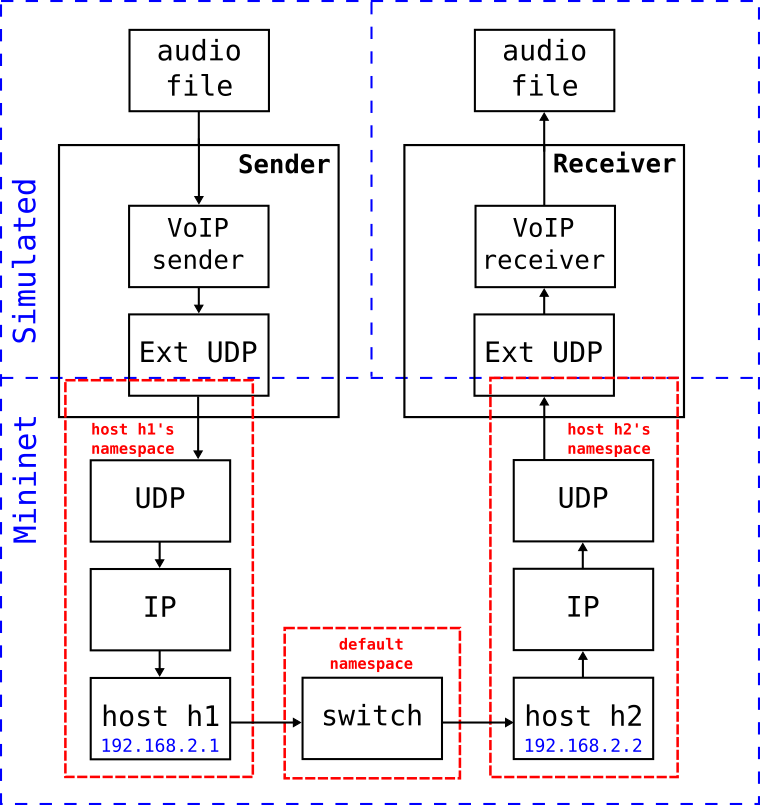
To recap, the goal of this showcase is to simulate transmission of a VoIP stream over a virtual network, where both the VoIP sender and receiver are simulations that are run in real-time. We use Mininet to set up a similar, but slightly extended network topology than in the previous showcase: two hosts connected via a switch. The simulations that run the VoIP sender and receiver are the same as in the previous showcase.
The setup is the following:
We use the following Python script in the mininet-veth.py file:
net = Mininet(controller = OVSController, waitConnected=True, intf=TCIntf)

info('*** Adding controller\n')
net.addController('c0')

info('*** Creating network topology\n')
h1 = net.addHost('h1', ip='192.168.2.1/24')
h2 = net.addHost('h2', ip='192.168.2.2/24')
s3 = net.addSwitch('s3')
net.addLink(h1, s3)
net.addLink(h2, s3)

info('*** Configuring link characteristics like bandwidth and packet loss\n')
h1.intf().config(bw=10, loss=10, delay='10ms', jitter='1ms')     # bandwidth in Mpbs, packet loss in %

info('*** Starting network\n')
net.start()

info('*** Starting INET simulations\n')
# Note: sudo is needed because Mininet runs as root, but we want to run the simulation as the normal user.
# We also need to restore the original PATH which is overwritten by 'sudo'.
h1.cmd('sudo -E -u $SAVED_USER bash -c "export PATH=$SAVED_PATH && inet -s voipsender.ini -c Mininet &"')
h2.cmd('sudo -E -u $SAVED_USER bash -c "export PATH=$SAVED_PATH && inet -s voipreceiver.ini -c Mininet &"')

info('*** Running CLI\n')
CLI(net)

info('*** Stopping network')
net.stop()
The Python file can be run with the /run_mininet.sh shell script:
#!/bin/sh
export SAVED_PATH=$PATH && export SAVED_USER=$USER && sudo -E python3 mininet-veth.py
The Python script should be fairly self-explanatory with the addhost(),
addSwitch(), and addLink() calls, and the two cmd() calls that
start the simulated apps on the virtual hosts. It is easy to see how this
example can be extended to create more complex topologies. Nevertheless, some
explanations are in order.
The
TCIntfinterface type is used to configure the virtual network interfaces. This allows the use of Traffic Control (TC) features of the Linux kernel to be used for the links, such as configuring the link bandwidth, packet loss, delay, jitter, etc.Note how the IP addresses of the hosts match in the Python script and in the
omnetpp.inifile.Note the use of
sudoat several places, and the use of theSAVED_USERandSAVED_PATHenvironment variables.sudois needed because Mininet needs to run as root (it can only do system-wide changes like creating network namespaces if it has the necessary permissions), but we want to run the simulations as a normal user. Once in Mininet, theSAVED_USERvariable is used to restore the current user for the simulations. TheSAVED_PATHvariable is used to restore thePATHenvironment variable thatsudooverwrites.The
CLI()call opens a Mininet prompt. Its purpose is to suspend the execution of the Python script until the user, after having finished with the experiment, presses Ctrl-D. Without it, the Python script would immediately continue to the end of the script where the virtual network infrastructure is deleted.
To run the simulation, use the run_mininet.sh script:
$ ./run_mininet.sh
Note
When starting Mininet, the following error might occur:
Exception: Please shut down the controller which is running on port 6653:
Active Internet connections (servers and established)
tcp        0      0 0.0.0.0:6653            0.0.0.0:*               LISTEN      1335/ovs-testcontro
If that happens, kill the controller process with sudo kill -9 <PID>. In this case, the PID is 1335.
When the simulations in Qtenv are loaded, make sure to start the receiver one first, and run both in Fast or Express mode. After the simulations are finished, exit the Mininet prompt with Ctrl-D to delete the virtual network infrastructure.
Results
Here are the results of the transfer via the lossy link. As a reference, you can listen to the original audio file by clicking the play button below:
Here is the received audio file:
The quality of the received sound is degraded compared to the original, due to the loss and jitter of the link.
Sources: voipsender.ini,
voipreceiver.ini,
AppContainer.ned,
run_mininet.py
Try It Yourself
If you already have INET and OMNeT++ installed, start the IDE by typing
omnetpp, import the INET project into the IDE, then navigate to the
inet/showcases/emulation/mininet folder in the Project Explorer. There, you can view
and edit the showcase files, run simulations, and analyze results.
Otherwise, there is an easy way to install INET and OMNeT++ using opp_env, and run the simulation interactively.
Ensure that opp_env is installed on your system, then execute:
$ opp_env install --init -w inet-workspace inet-4.6 --build-modes=release --options=inet:full
$ cd inet-workspace
$ sudo setcap cap_sys_admin+ep omnetpp-*/bin/opp_run_release
$ opp_env shell --options=inet:full
This command creates an inet-workspace directory, installs the appropriate
versions of INET and OMNeT++ within it, and opens an interactive shell. (The
--options=inet:full argument is required to enable the Emulation feature in
opp_env.)
Inside the shell, start the IDE by typing omnetpp, import the INET project,
then start exploring.
To experiment with the emulation examples, navigate to the
inet/showcases/emulation/mininet directory. From there, you can execute the
commands outlined in the previous sections.
Discussion
Use this page in the GitHub issue tracker for commenting on this showcase.