Differentiated Services
Goals
Differentiated Services (DiffServ) was invented to provide a simple and scalable quality of service (QoS) mechanism for IP networks. Differentiated Services can, for example, be used to provide low latency for delay-sensitive network traffic such as voice while providing simple best-effort service to other services such as web traffic or file transfer.
This showcase presents an example network that employs DiffServ to provide preferential service to voice over other types of traffic.
4.0About Differentiated Services
The INET User’s Guide, among many other resources, contains a good overview of Differentiated Services. If you are unfamiliar with the concept, we recommend you to read that first, because here we provide a summary only.
Differentiated Services classifies traffic entering a DiffServ domain into a limited number of forwarding classes, and encodes the forwarding class into the 6-bit DSCP field of the IP header. The DSCP field will then determine the treatment of packets (resource priority and drop priority) at intermediate nodes. In theory, a network could have up to 64 (i.e. 2^6) different traffic classes using different DSCPs. In practice, however, most networks use the following commonly defined per-hop behaviors:
Default PHB typically maps to best-effort traffic.
Expedited Forwarding (EF) PHB is dedicated to low-loss, low-latency traffic.
Assured Forwarding (AF) PHBs give assurance of delivery under prescribed conditions; there are four classes and three drop probabilities, yielding twelve separate DSCP encodings from AF11 through AF43.
Class Selector PHBs provide backward compatibility with the IP Precedence field.
As EF is often used for carrying VoIP traffic, we’ll also configure our example network to do that.
The model
The network
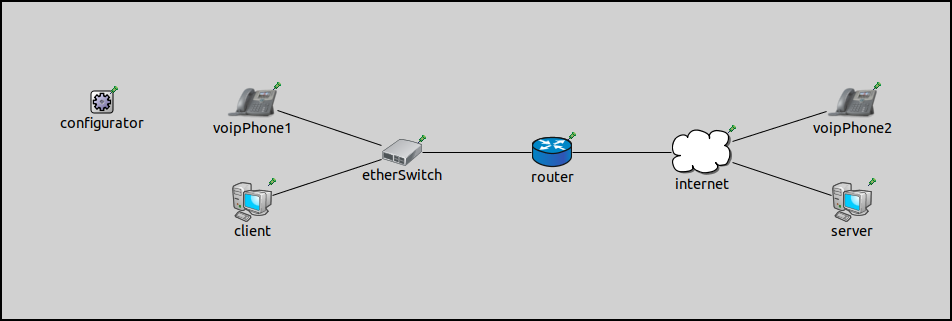
We will simulate one direction of a VoIP telephone call over the Internet while background traffic is present. Background traffic will be heavy enough to cause congestion in the first-hop router and impair voice quality at the receiver. Then we will use DiffServ to prioritize voice over background traffic to improve voice quality and reduce latency.
The following image shows the layout of the network:
In our setup, voipPhone1 will transmit VoIP packets to voipPhone2.
client will generate background traffic towards server.
The internet node represents the Internet. We set the capacity of the link
between router and internet deliberately low, to 128kbps,
so we can more easily saturate it and demonstrate the effects of congestion on voice quality.
To make the example more realistic, voipPhone1 will transmit the actual
contents of an audio file as VoIP traffic, and voipPhone2 will record the
received audio into a WAV file. By playing back the WAV file produced by the
simulation, we can directly assess voice quality.
The background traffic will be constant bit rate UDP traffic. Note that we use UDP instead of TCP because congestion control algorithms present in TCP make it difficult to cause congestion with it.
Configuration and Behavior
The showcase contains three different configurations:
VoIP_WithoutQoS: The queue in the router’s PPP interface is overloaded and packets are dropped.VoIP_WithPolicing: The VoIP traffic is classified as EF traffic and others as AF. AF traffic is rate limited using Token Bucket to 70% of the link’s capacity.VoIP_WithPolicingAndQueuing: This is the same as the previous configuration, except the router’s queue is configured so that EF packets are prioritized over other packets, so lower delays are expected.
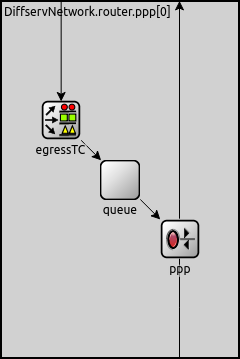
The router’s PPP interface contains the key elements of Differentiated
Services in this network: a queue (queue) and a traffic conditioner (egressTC).
If both of them are used, the layout of the interface looks like the following:
In the VoIP_WithPolicing and VoIP_WithPolicingAndQueuing
configurations, INET’s TrafficConditioner module is used in the
router’s PPP interface to achieve the required policing.
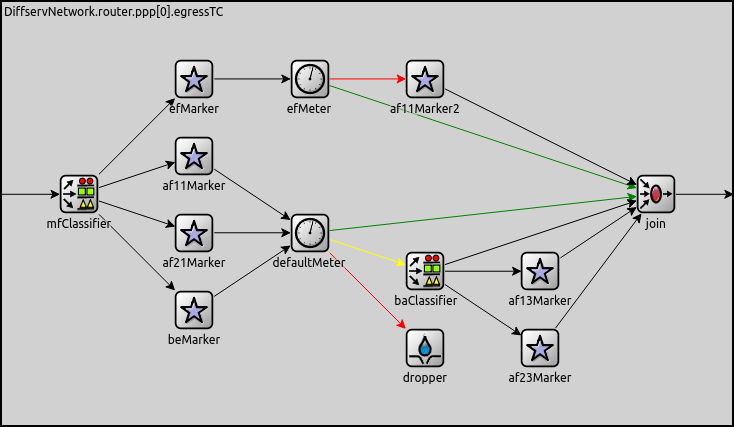
In TrafficConditioner, the mfClassifier submodule is used for
separating packets of different flows for marking with different DSCP values.
It contains a list of filters that identifies the flow and determines their classes.
Each filter can match the source and destination address, IP protocol
number, source and destination ports, or ToS of the datagram. The first
matching filter determines the index of the out gate. If no matching
filter is found, then the packet will be sent through the defaultOut
gate. The filters that are used in this showcase can be found in the
filters.xml file:
<filters>
  <filter destAddress="voipPhone2" protocol="udp" destPort="1000" gate="0"/>
  <filter destAddress="server" protocol="udp" destPort="5001" gate="1"/>
  <filter destAddress="server" protocol="udp" destPort="5002" gate="2"/>
</filters>
For example, the VoIP packets, which can be recognized by their
destination address voipPhone2 and UDP destination port 1000, are
marked as EF traffic.
The DSCP field of the packets is then set by the modules named
efMarker, af11Marker, af21Marker, and beMarker. The
differentiated handling of the marked packets is then achieved by
metering the traffic with the token bucket based meters efMeter and
defaultMeter, and dropping or reclassifying packets that do not
conform to the traffic profile. In particular, excess AF traffic will be
sent to the dropper module. Metering parameters are configured in
the omnetpp.ini file:
[Config WithPolicing]
description = "Diffserv traffic conditioning is turned on in the ppp[0] interface of the router"
**.router.ppp[0].egressTC.typename = "DiffservTrafficConditioner"
**.efMeter.cir = "70%"
**.efMeter.cbs = 50KiB
**.defaultMeter.cir = "30%"
**.defaultMeter.cbs = 2KiB
**.defaultMeter.ebs = 4KiB
In the VoIP_WithPolicingAndQueuing configuration, a
DiffservQueue module is used instead of DropTailQueue in the
router’s PPP interface to achieve priority queuing.
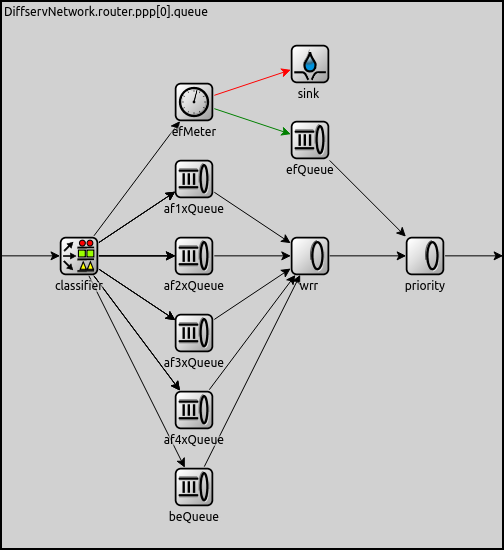
DiffservQueue, offered by INET, is an example queue that can be used
in interfaces of Differentiated Services core and edge nodes to support
AFxy and EF per-hop behaviors. The incoming packets are first classified
by the classifier module according to their DSCP field previously
set in the traffic conditioner. EF packets - these are the VoIP packets
in this case - are stored in a dedicated queue, and served first when a
packet is requested. Because they can preempt the other queues, the rate
of the EF packets should be limited to a fraction of the bandwidth of
the link. Limiting is achieved by metering the EF traffic with a token
bucket meter and dropping packets that do not conform to the traffic
profile configured in the omnetpp.ini file:
[Config WithQueueing]
description = "A DiffservQueue is added to the ppp[0] interface of the router"
**.router.ppp[*].queue.typename = "DiffservQueue"
**.router.ppp[0].queue.interfaceTableModule = "^.^.interfaceTable"
**.router.ppp[*].queue.efMeter.cir = "70%"
**.router.ppp[*].queue.efMeter.cbs = 5000B
We examine the results of the three different configurations listed above.
Results
Original Audio
As a reference, you can listen to the original audio file by clicking the play button below:
Without QoS
As expected, the quality of the received sound using the
VoIP_WithoutQoS configuration is very low:
The jaggedness in the received audio is because approximately half
of the VoIP packets sent by voipPhone1 are dropped by DropTailQueue
in the output interface of the router.
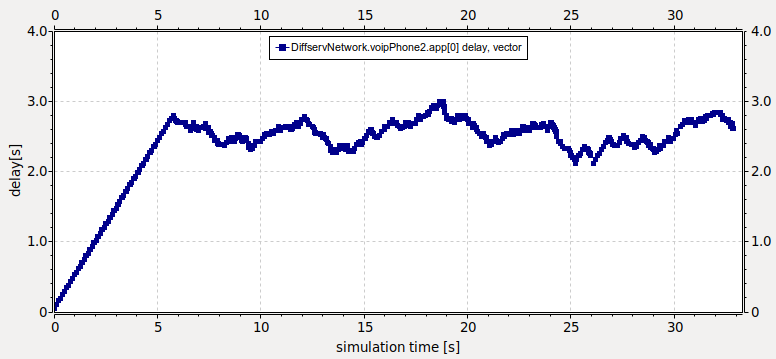
The delay of the VoIP packets also is very high, approximately 2.5 seconds, which is way too much compared to a real phone call. The following plot shows the delay of each VoIP packet:
The dropouts you hear can also easily be observed if we zoom into the timeline of the received audio using Audacity:
With Traffic Policing
In this configuration, we use a traffic conditioner inside the router’s PPP interface. The following (edited) video, captured from the simulation, shows the classification and the differentiated handling of the packets in the traffic conditioner.
We can see that VoIP packets (VOICE, SILENCE) are classified as
EF traffic, while the packets generated by client are classified as
AF traffic. As a result, the data rate of the VoIP traffic increases and
no VoIP packets are dropped.
The changes result in better sound quality. Dropouts can now only be observed at the beginning of the recording:
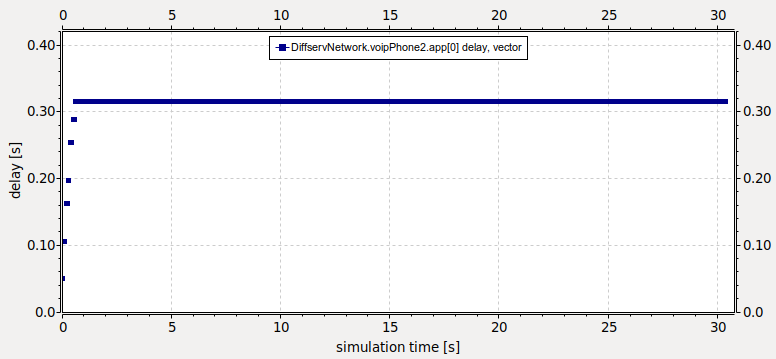
The following plot shows the delay of the VoIP packets:
Although the delay of the packets is much less than it was with the previous configuration (0.3s instead of 2.5s), it is still very high for IP telephony.
The dropout problem that was present throughout the whole transmission using the first configuration is successfully eliminated, as we can see if we take a look at the audio track:
With Traffic Policing and Priority Queuing
With the VoIP_WithPolicingAndQueuing configuration, the router’s queue
is configured to prioritize EF packets over other traffic.
The following video shows how the different types of packets are handled:
Note that the priority module always prefers efQueue; it only takes packets
from the other queues (via wrr) when efQueue is empty.
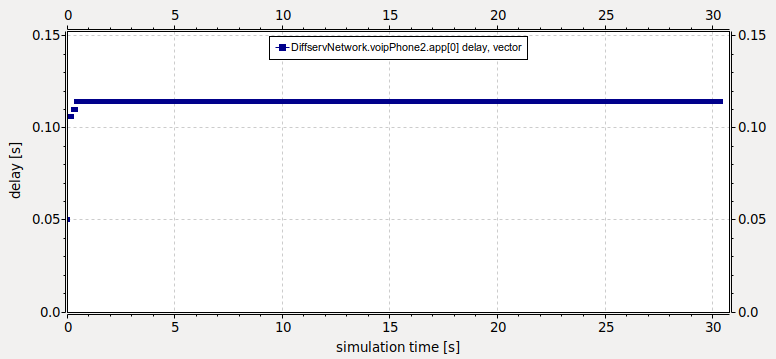
The fact that EF packets face shorter queues and have priority reduces their latency. Some delay still remains, of course, but the best audio quality could be reached with this configuration. The initial dropouts that were present in the previous configuration are almost inaudible now.
As seen from the next plot, the delay of voice packets has been reduced to about 0.11s:
Sources: omnetpp.ini, DiffservNetwork.ned
Try It Yourself
If you already have INET and OMNeT++ installed, start the IDE by typing
omnetpp, import the INET project into the IDE, then navigate to the
inet/showcases/general/diffserv folder in the Project Explorer. There, you can view
and edit the showcase files, run simulations, and analyze results.
Otherwise, there is an easy way to install INET and OMNeT++ using opp_env, and run the simulation interactively.
Ensure that opp_env is installed on your system, then execute:
$ opp_env run inet-4.0 --init -w inet-workspace --install --chdir \
   -c 'cd inet-4.0.*/showcases/general/diffserv && inet'
This command creates an inet-workspace directory, installs the appropriate
versions of INET and OMNeT++ within it, and launches the inet command in the
showcase directory for interactive simulation.
Alternatively, for a more hands-on experience, you can first set up the workspace and then open an interactive shell:
$ opp_env install --init -w inet-workspace inet-4.0
$ cd inet-workspace
$ opp_env shell
Inside the shell, start the IDE by typing omnetpp, import the INET project,
then start exploring.
