SAT-Solver-based Gate Schedule Configuration
Goals
This showcase demonstrates a gate schedule configurator that solves the autoconfiguration problem using a multivariate linear inequality system, directly producing the gate control lists from the variables.
4.4The Model
The SAT-solver-based gate schedule configurator requires the Z3 Gate Scheduling Configurator INET feature to be enabled, and the libz3-dev or z3-devel packages to be installed.
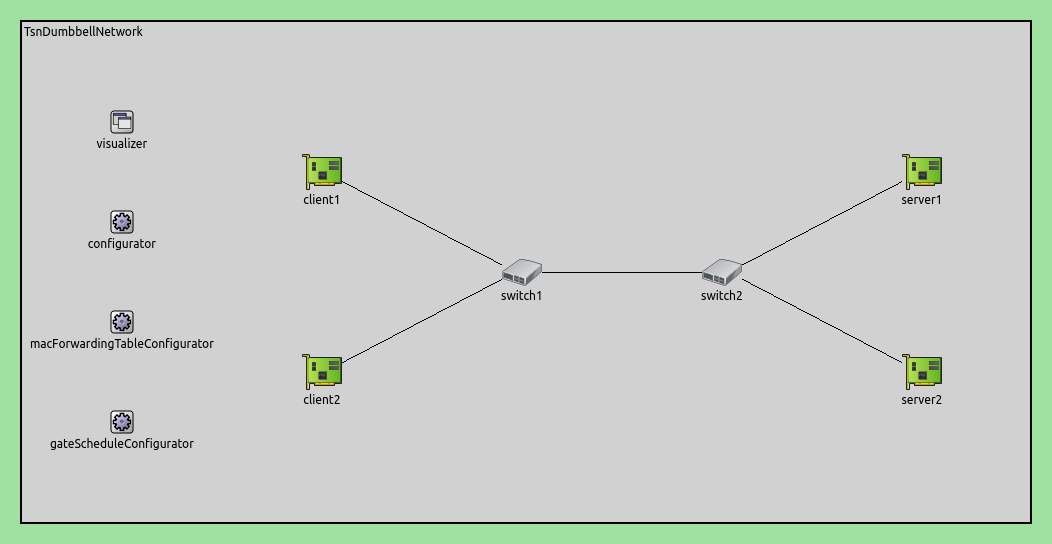
The simulation uses the following network:

Here is the configuration:
[SAT]
network = inet.networks.tsn.TsnDumbbellNetwork
description = "Z3 SAT based gate scheduling"
sim-time-limit = 0.2s
#record-eventlog = true

*.switch1.typename = "TsnSwitch1"
*.switch2.typename = "TsnSwitch2"

# client applications
*.client*.numApps = 2
*.client*.app[*].typename = "UdpSourceApp"
*.client*.app[0].display-name = "best effort"
*.client*.app[1].display-name = "video"
*.client*.app[0].io.destAddress = "server1"
*.client*.app[1].io.destAddress = "server2"
*.client1.app[0].io.destPort = 1000
*.client1.app[1].io.destPort = 1002
*.client2.app[0].io.destPort = 1001
*.client2.app[1].io.destPort = 1003
*.client*.app[*].source.packetNameFormat = "%M-%m-%c"
*.client*.app[0].source.packetLength = 1000B
*.client*.app[1].source.packetLength = 500B
*.client*.app[0].source.productionInterval = 500us # ~16Mbps
*.client*.app[1].source.productionInterval = 250us # ~16Mbps

# server applications
*.server*.numApps = 4
*.server*.app[*].typename = "UdpSinkApp"
*.server*.app[0..1].display-name = "best effort"
*.server*.app[2..3].display-name = "video"
*.server*.app[0].io.localPort = 1000
*.server*.app[1].io.localPort = 1001
*.server*.app[2].io.localPort = 1002
*.server*.app[3].io.localPort = 1003

# enable outgoing streams
*.client*.hasOutgoingStreams = true

# client stream identification
*.client*.bridging.streamIdentifier.identifier.mapping = [{stream: "best effort", packetFilter: expr(udp.destPort == 1000)},
                                                          {stream: "video", packetFilter: expr(udp.destPort == 1002)},
														  {stream: "best effort", packetFilter: expr(udp.destPort == 1001)},
														  {stream: "video", packetFilter: expr(udp.destPort == 1003)}]

# client stream encoding
*.client*.bridging.streamCoder.encoder.mapping = [{stream: "best effort", pcp: 0},
                                                  {stream: "video", pcp: 4}]

# enable streams
*.switch*.hasIncomingStreams = true
*.switch*.hasOutgoingStreams = true

*.switch*.bridging.streamCoder.decoder.mapping = [{pcp: 0, stream: "best effort"},
                                                  {pcp: 4, stream: "video"}]

*.switch*.bridging.streamCoder.encoder.mapping = [{stream: "best effort", pcp: 0},
                                                  {stream: "video", pcp: 4}]

# enable incoming streams
*.server*.hasIncomingStreams = true

# enable egress traffic shaping
*.switch*.hasEgressTrafficShaping = true

# time-aware traffic shaping with 2 queues
*.switch*.eth[*].macLayer.queue.numTrafficClasses = 2
*.switch*.eth[*].macLayer.queue.queue[0].display-name = "best effort"
*.switch*.eth[*].macLayer.queue.queue[1].display-name = "video"

# automatic gate scheduling
*.gateScheduleConfigurator.typename = "Z3GateScheduleConfigurator"
*.gateScheduleConfigurator.gateCycleDuration = 1ms
# 58B = 8B (UDP) + 20B (IP) + 4B (802.1 Q-TAG) + 14B (ETH MAC) + 4B (ETH FCS) + 8B (ETH PHY)
*.gateScheduleConfigurator.configuration =
   [{pcp: 0, gateIndex: 0, application: "app[0]", source: "client1", destination: "server1", packetLength: 1000B + 58B, packetInterval: 500us, maxLatency: 500us},
    {pcp: 4, gateIndex: 1, application: "app[1]", source: "client1", destination: "server2", packetLength: 500B + 58B, packetInterval: 250us, maxLatency: 500us},
    {pcp: 0, gateIndex: 0, application: "app[0]", source: "client2", destination: "server1", packetLength: 1000B + 58B, packetInterval: 500us, maxLatency: 500us},
    {pcp: 4, gateIndex: 1, application: "app[1]", source: "client2", destination: "server2", packetLength: 500B + 58B, packetInterval: 250us, maxLatency: 500us}]

# gate scheduling visualization
*.visualizer.gateScheduleVisualizer.displayGateSchedules = true
*.visualizer.gateScheduleVisualizer.displayDuration = 100us
*.visualizer.gateScheduleVisualizer.gateFilter = "*.switch1.eth[2].** or *.switch2.eth[0].**.transmissionGate[0] or *.switch2.eth[1].**.transmissionGate[1]"
*.visualizer.gateScheduleVisualizer.height = 16
Results
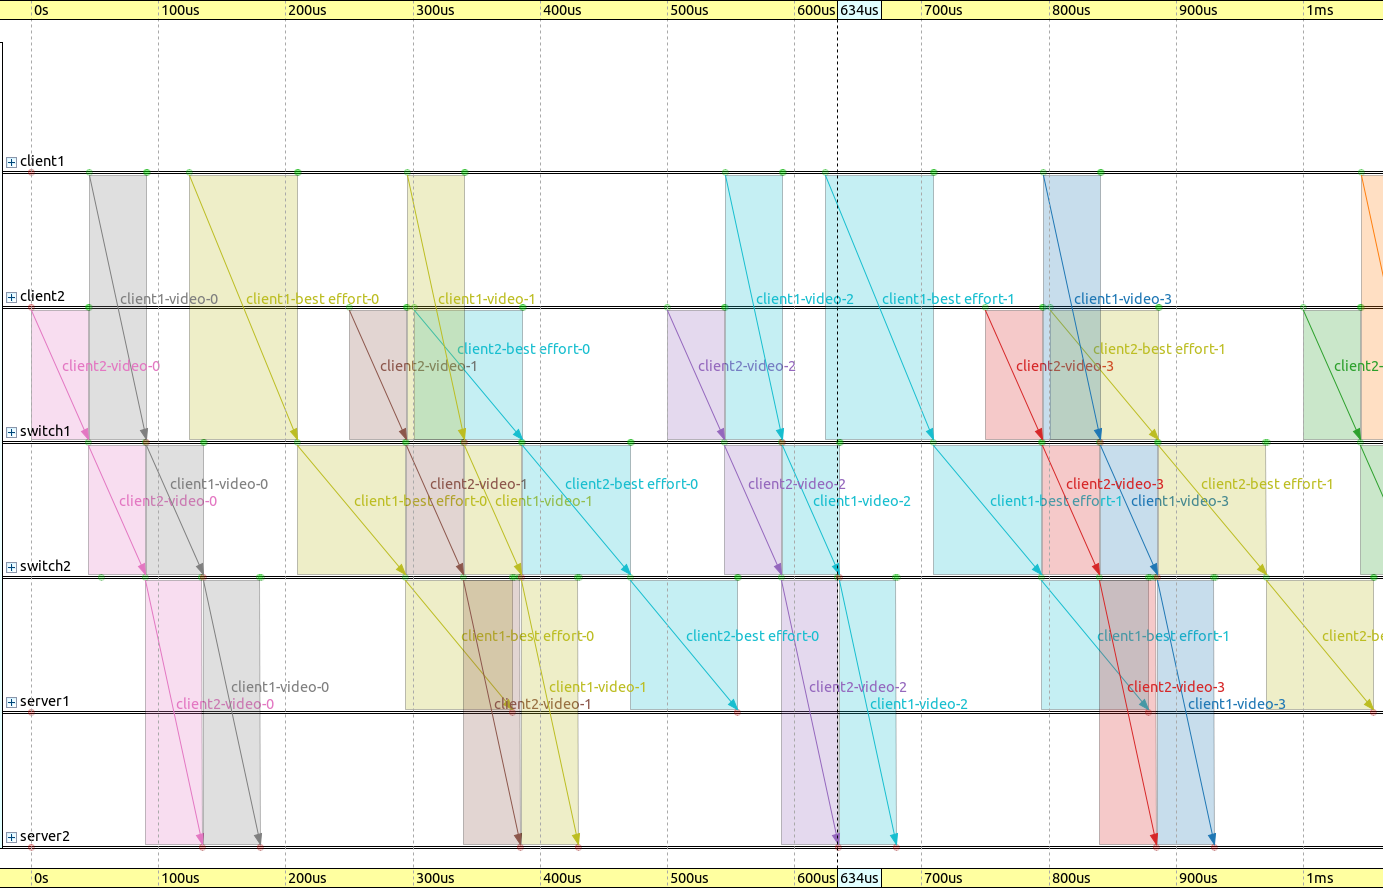
A gate cycle of 1ms is displayed on the following sequence chart. Note that the time efficiency of the gate schedules is even better than in the Eager case:

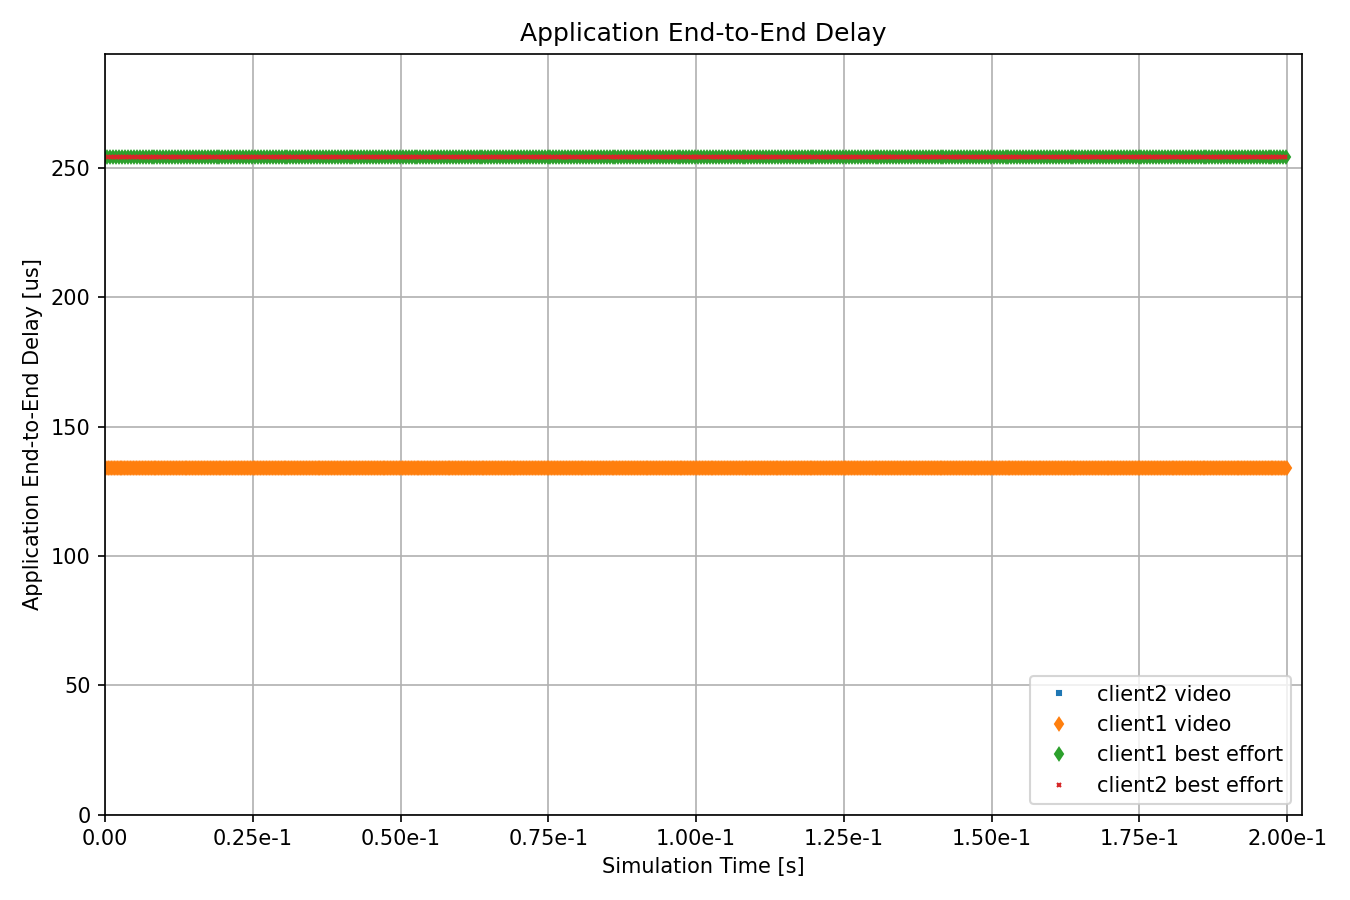
The application end-to-end delay for the different traffic classes is displayed on the following chart:

The delay is constant for every packet, and within the specified constraint of 500us. Note that the traffic delay is symmetric among the different source and sink combinations (in contrast with the Eager case).
The next sequence chart excerpt displays one packet as it travels from the packet source to the packet sink, with the delay indicated:

All packets have the exact same delay, which can be calculated analytically: (propagation time + transmission time) * 3 (queueing time is zero).
Inserting the values of 84.64 us transmission time and 0.05 us propagation time per link, the delay is 254.07 us for the best effort traffic category.
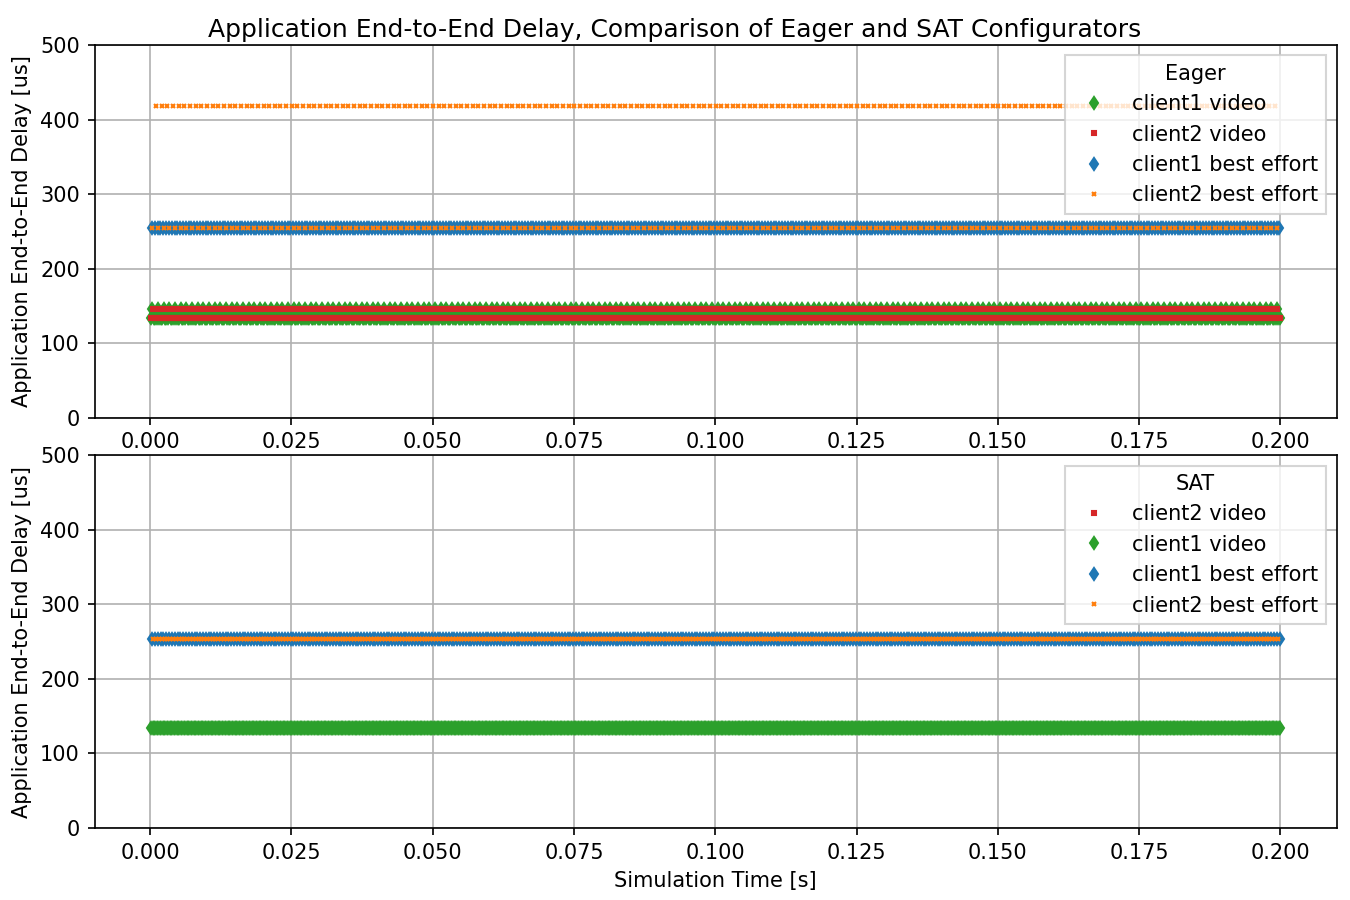
The following charts compare the SAT-based and Eager gate schedule configurators in terms of application end-to-end delay:

The difference is that in case of the SAT-based gate schedule configurator, all flows in a given traffic class have the same constant delay; in case of the eager configurator’s delay, some streams have more delay than others.
Sources: omnetpp.ini
Try It Yourself
If you already have INET and OMNeT++ installed, start the IDE by typing
omnetpp, import the INET project into the IDE, then navigate to the
inet/showcases/tsn/gatescheduling/sat folder in the Project Explorer. There, you can view
and edit the showcase files, run simulations, and analyze results.
Otherwise, there is an easy way to install INET and OMNeT++ using opp_env, and run the simulation interactively.
Ensure that opp_env is installed on your system, then execute:
$ opp_env run inet-4.4 --init -w inet-workspace --install --chdir \
   -c 'cd inet-4.4.*/showcases/tsn/gatescheduling/sat && inet'
This command creates an inet-workspace directory, installs the appropriate
versions of INET and OMNeT++ within it, and launches the inet command in the
showcase directory for interactive simulation.
Alternatively, for a more hands-on experience, you can first set up the workspace and then open an interactive shell:
$ opp_env install --init -w inet-workspace inet-4.4
$ cd inet-workspace
$ opp_env shell
Inside the shell, start the IDE by typing omnetpp, import the INET project,
then start exploring.